 If you are an editor or any kind of author, from journalist, lawyer to software developer and you want to see what has changed in your text, then get our other software product Florencesoft TextDiff.
 DiffEngineX Help - Finding Differences Between Excel Spreadsheets

Overview
DiffEngineX reports the differences between two Microsoft® Excel workbooks. You can choose whether to compare every worksheet contained in the two books (select Whole Workbooks) or just selected sheets (select Selected Sheets). If you compare at the Whole Workbook level, worksheets with the same name are automatically compared with each other. If you want to compare two sheets with different names you must select Selected Sheets and make sure only one sheet is selected in each of the list boxes.
DiffEngineX only reports on the differences between the formulae, constants, defined names, cell comments and Visual Basic code found in spreadsheets. It does not compare charts.
Every comparison will generate a new workbook listing each cell difference. This new workbook will contain one worksheet for every pair of sheets compared. Its very last worksheet is a summary of the number of different cells found in each pair.
DiffEngineX does not modify the workbooks you select to be compared in any way. However when some of its options are selected it will create in-memory copies of your workbooks and modify these instead. DiffEngineX needs to modify these copies as part of the work done for Color Differences At Cell Level, Align Rows, Align Columns and Highlight Character Level Differences.
The Short Guide To Using DiffEngineX can be found here.
A step-by-step tutorial on how to compare two lists of data can be found at the bottom of this help page.
Important
If it seems DiffEngineX is failing to spot similarities between worksheets and as a result is reporting spurious differences, you will need to select Align Columns and/or Align Rows. Alignment is the insertion of blank rows and/or columns such that the identical cells in two sheets end up with the same row and column numbers. Identical cells are only recognised for what they are if they have the same row and column numbers.
When Align Columns is selected you will be asked to select a row (or the rows) containing column headings, after the Start Comparison button has been pressed. If the sheets being compared do not have column headings, select a row present in both sheets that has the same meaning and same row number.
When Align Rows is selected you will be asked to select a column (or the columns) that will be looked at during the process of row alignment, after the Start Comparison button has been pressed. Selection of one or two columns that act as unique row identifiers will work for most cases. NOTE: You may need to get Microsoft Excel to pre-sort rows of data before using DiffEngineX. Please refer to our tutorial.
By default Align Rows and Align Columns only align matching rows and columns. They are not concerned with unmatched rows and columns. Select Use Alignment Plus to ensure that unmatched rows and columns in sheet #1 are explicitly paired with blank rows and columns in sheet #2. This makes it easier to spot deletions and insertions.
If your worksheets contain mostly formulae, it is recommended that Use Alignment Plus is turned off.
It is recommended the Color Differences At Cell Level is always selected as it offers a much clearer way to see differences compared to a cell-by-cell listing.
Two important important options to find out about are Compact Like Changes When Contiguous and The Actual Formulae/Their Calculated Values.
Highlight Character Level Differences
This option directly colors in red differences found at the character level for text, formulae, numbers and dates on the workbook copies. As part of this operation, numbers, formulae and dates will be single quoted first. Excel does not allow these types to be colored at the character level without a preceding single quote. The introduction of a single quote means that the workbook copies produced by DiffEngineX can now only be viewed as reports listing differences rather than functional spreadsheets. If the option to compare the values of formulae, rather than the formulae themselves, is selected then formulae will be substituted by their values on the workbook copies, where the values are found to differ. Your original workbooks are not altered by this process.
This should not be confused with Color Differences At Cell Level which only indicates differences at the whole cell level or Color in Red Precisely The Parts of Formulae and Text Constants That Differ which highlights character level differences on the difference report.
This option should be used with care as it can greatly slow down comparisons when the number of differences is large.
International Users
If your current regional settings do not match the language version of Office/Excel installed, DiffEngineX may not work correctly.
To prevent problems it is recommended you select the option Ensure application works when Excel language version not equal to Regional Settings.
Difference Report
The difference report is generated in a new workbook. It contains one worksheet for every pair of worksheets compared. Its last sheet is a summary of the number of differences found.
The entries list the cell differences. They are organized into five columns.
The first column contains the addresses of cells found to differ. (Each entry is the address of a single cell unless the option Compact Like Changes When Contiguous has been selected.) If row/column alignment is selected, the addresses refer to the workbook copies made by DiffEngineX. These addresses will differ from the ones in your original workbooks if blank alignment rows/columns have been inserted.
The next two columns quote the cell content found to differ.
The last two columns are only relevant if row and/or column alignment is selected. They contain the cell addresses of the different content in the original workbooks selected for comparison. These are unaffected by the insertion of blank alignment rows and columns. Blank rows and columns are only inserted in workbook copies. If you are referring back to your original workbooks you should use the values in these two columns rather than the very first one.
Comparing Folders of Excel Workbook Files (xlsx, xlsm, xlsb, xls)
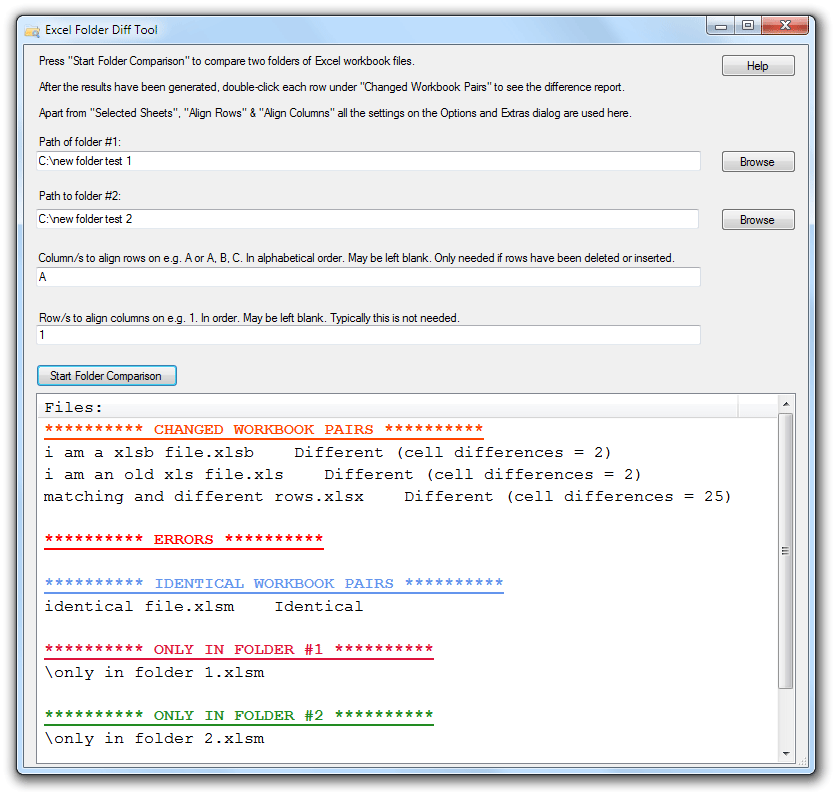
Selecting the menu item Compare Folders from the Tools menu allows you to compare two folders of Excel workbook files (xlsx, xlsm, xlsb and xls) for differences with one operation. Subdirectories are included.
Unless you have obtained a registration key, your limited number of trial comparisons will be exhausted quickly by comparing folders. Each comparison after the trial ends will be listed under ERRORS.
Use the two Browse buttons to select folders displayed in the Path of folder entry fields. Start Folder Comparison will report on the number of differences found between each pair of Excel files in the two folders with the same filename.
Double-Click Each Row for Detailed Report of Differences
Once the results have been displayed, double-clicking each row will show a detailed report of differences between a pair of Excel files.
Results
The results are shown in six different sections.
CHANGED WORKBOOK PAIRS
The number of worksheet cells found to differ between each pair are shown here.
Double-clicking will show a detailed report of differences.
ERRORS
Spreadsheets that could not be compared are listed here.
One reason for this is that the number of comparisons allowed by the trial has been exceeded.
IDENTICAL WORKBOOK PAIRS
Spreadsheets with no differences are listed here.
ONLY IN FOLDER #1
Files only found in the first folder are listed here.
ONLY IN FOLDER #2
Files only found in the second folder are listed here.
FILES NOT COMPARED
Pairs of files that do not have the .xlsx, .xlsm, .xlsb or .xls extension are listed here.
Options and Extras
All the settings you have specified on the Options and Extras dialog boxes are used for the comparisons. If you wish to compare as much as possible of the Excel workbook we recommend you close the Excel Folder Diff Tool window and go back to the Options dialog, available from the main part of the user interface, and check Compare Excel Defined Names, Compare Comments and Compare Visual Basic Code / Macros.
In addition, the settings corresponding to Use Alignment Plus, Color Differences At Cell Level and Highlight Character Level Differences are used.
It is not possible to only compare a subset of worksheets per workbook from the tool.
Align Rows and Align Columns are not used as this tool has its own entry fields for optional row and column alignment.
Column/s to align rows on
This field can be left blank. If your worksheets have had new rows inserted into them, deleted or you are comparing sorted rows of data, this field needs to be filled in, otherwise spurious differences will be reported. If you are comparing rows of data, rather than formulae based spreadsheets, you need to pre-sort them first. You need to enter the letters representing the columns that act as unique row identifiers. These may be the column or columns that store email addresses, names or id numbers.
If you are comparing formulae based spreadsheets, you may want to just enter A or perhaps A, B, C and see the results.
Row/s to align columns on
This field can be left blank. In most cases it is not needed. If your spreadsheets contain inserted columns, specify the Excel row containing the column headings e.g. 1 (the first Excel row).
Extras
When Color Differences At Cell Level is selected, the cells that differ between two sheets are highlighted with color. When the comparison has finished, copies of the two workbooks you selected are generated with the added color, in addition to the difference report workbook. Once again these are _copies_ of your workbooks and will not be saved to your hard drive unless you ask Microsoft® Excel to.
The Extras dialog allows you to specify what colors are used. It is invoked by pressing the Extras button.
In the Extras dialog, a deleted cell is defined as a cell with content in Workbook #1, but no content in Workbook #2. An addition is defined as a cell with content in Workbook #2, but no content in Workbook #1. In this respect Workbook #1 can be considered the original workbook and Workbook #2 the modified copy. However these defintions can be changed using the option described below.
Interpret Modified Cell As Deletion And Addition (Deprecated)
When row alignment is selected, DiffEngineX makes sure that rows with the same identifiers (these identifiers are in the columns you specify for row alignment) line up and are not color highlighted unless the rest of the row differs.
Suppose a row with 23 for its unique identifier is deleted from the original. The modified spreadsheet has the number 27 in a corresponding cell. Should DiffEngineX color this as a modified cell in both sheets (default: light orange) or is it really a deletion (default: red) from the original sheet and an addition (default: green) in the modified sheet?
This option found on the Extras dialog allows you to decide. Excel 2007 allows users to sort on color and as such it is now possible to easily see all the added rows and all the deleted rows together without different types of rows getting in between them. A sorting step in Excel is needed afterwards.
By default this option is not selected. Align Rows has to be selected as well. This option only affects the cells in the columns specified for row alignment i.e. the chosen unique row identifiers.
This option is no longer recommended. Please select Use Alignment Plus instead, which works for both row and column alignment.
Existing Color Removal
Existing workbook color may make inspection of the results difficult. The Extras dialog offers you the option of removing unconditional color from the workbook copies before it starts to highlight the differences. Color is not removed from the original workbooks you select.
Existing Hidden Sheets/Cells
Excel allows spreadsheet authors to hide whole rows and columns. Additionally whole sheets may be made invisible. Differences may occur in these hidden regions. Obviously there is little point in coloring a pair of cells if the results cannot be seen. An option exists to unhide sheets, rows and columns on the workbook copies, regardless of whether they are hidden directly or by use of filters. The original workbooks are not modified by selecting this option. Note that selecting this option will only have an effect if Color Differences At Cell Level is also selected on the main part of the user interface.
It is recommended that this option is always kept selected if you make use of hidden cells or filtered rows.
Existing Hidden Workbooks
Excel allows whole workbooks to be hidden. This option unhides the workbooks copies made from the originals being compared. Any hidden worksheets or cells inside the workbooks will be untouched. Note that selecting this option will only have an effect if Color Differences At Cell Level is also selected on the main part of the user interface.
Hide Rows (Matching or Different)
If large worksheets are compared and the different rows are widely separated, inspection of all the color highlighted rows may be difficult. An option exists to hide the matching rows, leaving just the different rows visible. Selecting Hide Matching Rows for this option will hide all matching rows. Selecting Hide Matching Rows, but show 4 rows on either side as context will leave a few rows visible around each differing row.
If you wish to see the opposite (only the rows with no differences) you should select Hide Different Rows. This hides all the rows that differ, leaving just the matching rows behind. Hide Different Rows, but show 4 rows on either side as context will make sure a few rows are visible around each matching row.
Note that selecting any of these options will only have an effect if Color Differences At Cell Level is also selected on the main part of the user interface.
Limitations: Cell comments are not taken into consideration when hiding rows.
If you require the individual characters that differ between cells precisely highlighted on the difference report, see the option Color in Red Precisely The Parts of Formulae and Text Constants That Differ.
Align Columns
If your are comparing an original worksheet to its modified copy and part of the modifications included the insertion or deletion of columns you will need to select Align Columns.
Without Align Columns similar regions in the sheets will be incorrectly reported as different just because the same content is shifted to the left or right.
When the Align Columns checkbox is selected you will be asked to specify what rows are used to help with column alignment after pressing the Start Comparison button. A good choice is to select the row containing column headings, if one exists. At the very least select the first row that contains content.
If the modifications that have taken place do not include the insertion or deletion of columns this option should not be selected.
Align Columns works by inserting blank columns into the workbook copies being compared. These blank columns are color highlighted. The color used can be specified with the Extras dialog.
Align Columns Example
Consider the workbooks original.xls and modified.xls shown in Figure 1. You can see the new Website column has been inserted into modified.xls.
original1.xls and modified1.xls are the result of a comparison without column alignment. You can see the Personal and Work Emails have been incorrectly flagged as different.
original2.xls and modified2.xls are the result of a comparison with column alignment. Row 1 was added to the Selected Rows list using the Align Columns dialog box. Row 1 contains the column headings of First Name, Last Name, (Website), Personal Email and Work Email. The new Website column cells are correctly flagged as new content by use of the color green.
Align columns also works when columns have been deleted.
Figure 1.
Align Rows
If you are comparing an original worksheet to its modified copy and part of the modifications included the insertion or deletion of rows you will need to select Align Rows.
Without Align Rows, similar regions will be incorrectly reported as different just because the same content is shifted up or down.
When the Align Rows checkbox is selected you will be asked to specify what columns are used to help with row alignment after pressing the Start Comparison button. For rows of data, you should select the column or columns that act as unique row identifiers. If you are not comparing data, a reasonable choice is to select the first column or two with content.
NOTE: You may need to get Microsoft Excel to pre-sort rows of data before using DiffEngineX. Please refer to our tutorial.
If the modifications that have taken place do not include the insertion or deletion of rows this option should not be selected.
Align Rows works by inserting blank rows into the workbook copies being compared. These blank rows are color highlighted. The color used can be specified with the Extras dialog.
Align Rows Example
Consider the workbooks original.xls and modified.xls shown in Figure 2. You can see a new row with the content { 4400, Sports Car, 999 } has been added.
original1.xls and modified1.xls are the result of a comparison without row alignment. You can see three rows have been incorrectly flagged as different, when only 1 new row was added.
original2.xls and modified2.xls are the result of a comparison with row alignment. Column A was added to the Selected Columns list using the Align Rows dialog box. Column A contains order numbers that uniquely describe the contents of each row. The new row is correctly flagged as new content by use of the color green.
Align Rows also works when rows have been deleted.
Figure 2.
Options
Compact Like Changes When Contiguous
Selecting this option can potentially reduce the verbosity of DiffEngineX reports.
For example if three adjacent cells contain equivalent content and they are all changed to the same formulae or constant, the change is reported on one line instead of three.
For example
| E2:G2 | =A1*3 | =A1*9 |
*
will be listed instead of
| E2 | =A1*3 | =A1*9 |
| F2 | =B1*3 | =B1*9 |
| G2 | =C1*3 | =C1*9 |
*For multi-cell ranges of equivalent formulae, the one A1 style formulae shown is relative to the first cell of the range.
Color Alternate Rows
Selecting this option makes difference reports easier to read as every other row is color highlighted.
Color in Red Precisely The Parts of Formulae and Text Constants That Differ
Selecting this option highlights the exact parts of formulae and text constants, with the color red, that differ between two worksheets. The highlighting is applied to the cell content quoted on the difference report.
Dates and numeric constants are not covered by this option.
This option can slow down comparisons when the number of cell differences is large. It is recommended that Compact Like Changes When Contiguous is selected as well with this option in order to reduce the amount of work needed to be performed on each difference report.
This option should not be confused with Color Differences At Cell Level which is available on the main part of the user interface. Color Differences At Cell Level applies background color to whole cells on copies of the workbooks selected for comparison. The option discussed here applies foreground color to selected parts of formulae and text constants on the difference report.
Highlight Character Level Differences is similar in action to this option, however it works on the workbook copies rather than on the difference report.
An example of the precise highlighting offered by this option is shown below.
| E1 | =A1+Costs+4 | =A1+NewCosts+6 |
| G2 | The quick cat. | The slow cat. |
Compare Excel Defined Names
Select this option to compare Excel defined names. The results will be listed on the difference report.
Excel allows names with either workbook or worksheet-level scope to be created. Workbook-level scope names are only compared when Whole Workbooks is selected on the main part of the user-interface. Likewise if /sheets is supplied as a command-line argument, workbook-level scope names are not compared.
Ranges and formulae referred to by names are always reported in R1C1 notation regardless of DiffEngineX's A1 or R1C1 notation setting.
This is because a cell reference in R1C1 notation is self-contained. Cell references in A1 notation can only be understood with reference to what Excel regards is the Active Cell at a particular moment in time, if they have any part of them that is a relative rather than absolute reference.
For example the Excel defined name and definition of CellBelow = Sheet1!R[1]C unambiguously refers to the cell 1 row down and 0 columns across, regardless of what the Active Cell happens to be at the time
However in A1 notation the same Excel defined name and defintion is
CellBelow = Sheet1!D18 when the Active Cell is $D$17
and
Cell Below = Sheet1!E18 when the Active Cell is $E$17
and
CellBelow = Sheet1!J3 when the ActiveCell is $J$2.
As such, due to relative references, it is better to compare name definitions in R1C1 notation.
When using this option you may also want to turn on Color in Red Precisely The Parts of Formulae and Text Constants That Differ.
If the names in Sheet1 are compared against the names in Sheet2, then the name Sheet1!MyName will be compared against Sheet2!MyName i.e. the worksheet-level scope name prefixes are ignored. Any sheet prefixes in the actual defintion are compared as-is i.e. Sheet1!MyName = Sheet1!$A$1 will be treated as a modification of Sheet2!MyName = Sheet2!$A$1.
Add Hyperlinks To Aid Navigation
Figure 3.
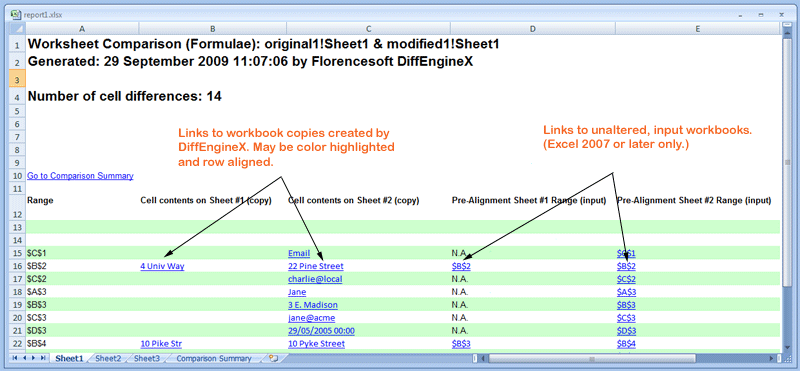
Selecting this option adds three kinds of hyperlinks to the difference report (titled Sheet1 by default).
-
Internal links between the Comparison Summary sheet and the individual sheets listing the differences for each pair of compared sheets.
-
Links to the workbook copies created by DiffEngineX as part of the comparison process. These may be color highlighted and have blank rows inserted for alignment. However, if the user closes these temporary copies, the hyperlinks will no longer work. Each link leads to a cell found to differ.
-
Links to the unaltered, input spreadsheets supplied by the user. Each link leads to a cell found to differ. Unfortunately these links only work properly in Excel 2007. In Excel 2002/XP and Excel 2003, these links mistakenly jump to the workbook copies instead. This is a problem intrinsic to Excel. This can be fixed by closing the workbook copies first
Annoyances:
Excel displays a warning when clicking on a link to an external workbook. If the workbook containing the link is saved to the file system, this warning is no longer shown.
It may be more convenient to generate a difference report with hyperlinks via the Command Prompt. This way the color highlighted copies and the difference report are automatically saved to the file system and the warning dialog boxes and pre-Excel 2007 problems can be avoided.
Sample commands are given below. Mutiple commands can be added to a *.cmd file. Although the examples shown here are split across several lines, ensure that each individual command does not contain newlines or carriage returns.
Excel 2003
"C:\Program Files\Florencesoft\DiffEngineX\DiffEngineX.exe"
/inbook1:"c:\my books\original.xls"
/inbook2:"c:\my books\modified.xls"
/outbook1:"c:\my books\outbook1.xls"
/outbook2:"c:\my books\outbook2.xls"
/report:"c:\my books\report1.xls"
/alignrows:"A" /coloralternaterows /colordifferences
/addhyperlinks /show
Excel 2007
"C:\Program Files\Florencesoft\DiffEngineX\DiffEngineX.exe"
/inbook1:"c:\my books\original.xlsx"
/inbook2:"c:\my books\modified.xlsx"
/outbook1:"c:\my books\outbook1.xlsx"
/outbook2:"c:\my books\outbook2.xlsx"
/report:"c:\my books\report1.xlsx"
/alignrows:"A" /coloralternaterows /colordifferences
/addhyperlinks /show
Compare Comments
Select this option to compare Excel comments. The results will be listed on the difference report.
When using this option you may also want to turn on Color in Red Precisely The Parts of Formulae and Text Constants That Differ.
Limitations: Cell comments are not taken into consideration when hiding different or matching rows.
Compare Visual Basic Code / Macros
This compares the Visual Basic for Applications (VBA) code and macros embedded in your spreadsheet. In order for this option to work you must change your default Excel options. If you are using Excel 2007 or later, go to Excel Options->Trust Center->Trust Center Settings...->Macro Settings and ensure that Trust access to the VBA project object model is checked.
If you are using Excel 2003 (or earlier), change the relevant option under Tools->Macro->Security...->Trusted Publishers.
The Visual Basic difference report is generated as linked HTML pages and is displayed in your default web browser. If the difference report is generated via DiffEngineX's user interface it will be placed in a temporary directory and kept for seven days, unless moved to another directory. If the report is generated by invoking DiffEngineX from the command-prompt, it will be kept until DiffEngineX is run again with the same user-specified output directory.
All the Visual Basic code modules, class modules, code behind userforms and macros are compared regardless of whether Whole Workbooks or Selected Sheets is selected. Empty code modules are ignored.
The DiffEngineX options relating to how spreadsheets cells are compared and color highlighted are not used when comparing Visual Basic, except for Case Insensitive Comparisons.
A key to the colors used to indicate the comparison results are given below.
Deleted Text
Added Text
Moved Up
Moved Down
Not Changed
A1 or R1C1 Notation
The reports DiffEngineX generates contain cell content where it is found to differ. If the differing content contains formulae this option allows it to be reported in either A1 or R1C1 notation. In A1 notation rows are labeled numerically and columns are labeled alphabetically. In R1C1 notation, both columns and rows are labeled numerically.
Case Insensitive Comparisons
Select this option if you want cell content to be compared without regard to its capitalization. For example when this option is checked the constant "Sales" will be treated as equivalent to "sales".
Ignore Smart Character Differences
When this option is selected, curly double (“ and ”) and single quotes (‘ and ’) will be treated as equivalent to their straight counterparts (" and '). The dash character (–) will be treated as equivalent to a hyphen (-).
White Space
Select Ignore Surrounding White Space if you want cell content to be compared without regard to leading and trailing white space. For example when this option is checked the text " cats and dogs " will be treated as equivalent to "cats and dogs". White space between characters and words is not ignored.
Select Ignore All Non-Significant White Space if you want all superfluous white space to be ignored. This includes leading and trailing white space. This means that two or more adjacent white space characters will be treated as being only one white space character. For example when this option is checked the text " cats and dogs " will be treated as equivalent to "cats and dogs".
The quotation marks have been added for clarity and are not part of the text.
The Actual Formulae or Their Calculated Values
If two cells containing formulae are being compared, a choice has to be made whether to compare the actual formulae themselves or their calculated values.
For example if two cells containing =2*6 and =3*4 are compared with The Actual Formulae checked they will be reported as different. If Their Calculated Values is checked they will be reported as identical.
Test For An Exact Numeric Match
Numbers are tested for an exact numeric match. Any difference, however small, will be reported.
If you wish to compare the calculated values of formulae, rather than the formulae text itself, you should select the option Their Calculated Values.
Compare Up To [x] Decimal Places
Select this option to specify the maximum number of digits after the decimal point that are used when comparing numeric values. In this way it is possible to have the values 3.1428 and 3.1429 treated as being equal when comparing up to 3 decimal places.
Use this option together with Round Away From Zero or Round To Even.
If you wish to compare the calculated values of formulae, rather than the formulae text itself, you should select the option Their Calculated Values.
Smallest Difference Is [x]
This option allows you to specify that a pair of numbers will only be flagged as different if the absolute value of their difference is at least as great as the number provided by the user. Only positive, non-zero, values are permitted. If the smallest difference is set to 10, then the numbers 1000 and 1009 will be treated as being equal.
If you wish to compare the calculated values of formulae, rather than the formulae text itself, you should select the option Their Calculated Values.
Smallest Percentage Difference Is [x] %
This option allows you to specify that a pair of numbers will only be flagged as different if the percentage change (increase or decrease) from the first number to the second number is at least as great as the percentage provided by the user. Only positive, non-zero, percentages can be entered.
If you specify that changes of 10% and above will be considered, then 10 will be found to differ from both 9 (percentage decrease) and 11 (percentage increase). Effectively the sign of the percentage change is ignored.
As a further example, if you specify that only percentage changes of 120% and above will be considered, then 0.5 will be found to differ from -0.1 (a 120% decrease) as well as 1.1 (a 120% increase). Obviously any number above 1.1 and below -0.1 will be found to differ as well.
When specifying the pair of spreadsheets to be compared, one workbook is designated #1 and the other #2. The designation of which spreadsheet is #1 and #2 can affect the results you see. To understand this statement consider the following. The percentage increase from 1 (workbook #1) to 100 (workbook #2) is 9900%. However the percentage decrease from 100 (workbook #1) to 1 (workbook #2) is only 99%.
Our definition of the percentage change from cell#1 to cell#2 is ( Absolute_Value_Of(cell#1 - cell#2) / Absolute_Value_Of(cell#1) ) * 100.
Only the first 8 decimal places of the percentage difference you specify are used.
If you wish to compare the calculated values of formulae, rather than the formulae text itself, you should select the option Their Calculated Values.
Round Away From Zero or Round To Even
This option is only used if you decide to compare a certain number of decimal places. Numeric values have to be rounded before they are compared. When comparing to 1 decimal place, the number 2.45 is midway between 2.4 and 2.5. If Round away from zero is selected it will be rounded to 2.5 before being compared. If Round to even is selected the first decimal place will be rounded to the nearest even number and so give 2.4.
Ensure application works when Excel language version not equal to Regional Settings
If your Control Panel Regional Options (such as French (Canada), Italian (Italy) etc.) do match the localized language version of Excel you have installed, DiffEngineX will generate error messages each time it is run.
To prevent problems you may wish to consider one of the below.
- Purchase a localized language version of Excel that matches your Regional Options.
- Change your Control Panel Regional Options to match the language version of Excel.
- Check the DiffEngineX option Ensure application works when Excel language version not equal to Regional Settings.
Changing your Control Panel Regional Options is not recommended as it has wide ranging effects.
Only check the DiffEngineX provided option if you encounter problems.
Figure 4.
Protected Worksheets
Protected worksheets are Excel sheets that are protected from modification. This level of protection can optionally use a password.
DiffEngineX makes temporary copies of the Excel workbooks you are comparing and inserts blank rows into them so that matching rows line up. This is necessary when new rows have been added or existing rows have been deleted.
The above means that, by default, workbooks containing protected worksheets cannot be compared by DiffEngineX, unless of course you specify you only want DiffEngineX to compare a subset of worksheets that are not protected.
Selecting Unprotect Worksheets from the Settings menu allows you to specify a password enabling DiffEngineX to unprotect protected worksheets before it compares them. It is possible to specify a password consisting only of the empty string. DiffEngineX only unprotects the temporary copies it makes of your workbooks. Your workbooks are unaltered by DiffEngineX.
Fix Problems
Certain Excel settings are temporarily turned off to make comparisons faster and also to reduce unnecessary user interaction. Once a comparison has completed the settings are returned to their original values.
It has been found that turning off Excel screen updating has caused problems with recent Microsoft updates to their Office and Windows software.
The Fix Problems dialog available from the Settings menu allows you to control whether certain Excel features are turned off or left unchanged.
If Excel errors or exceptions are being raised during the comparison process you may wish uncheck the boxes available here to ensure no Excel settings are turned off.
Command Line Arguments
If command line arguments are supplied to DiffEngineX, it will compare workbooks without its user interface being displayed. This can be useful if you wish to compare multiple workbooks one after another using a series of commands stored in a *.bat file.
You must first locate the DiffEngineX.exe file. Typically it will have the location specified below.
C:\Program Files\Florencesoft\DiffEngineX\DiffEngineX.exe
Values are passed to DiffEngineX by means of switches. Each switch is prefixed with a forward slash / and is separated from its associated value or values by a colon :.
Some switches are associated with a single value. Others are associated with a comma separated list of values. File names and comma separated lists containing white space characters must be enclosed with double quotation marks e.g.

The switch /sheets has been used to limit the comparison to the sheets Cash Flow, Notes and Annual Fin St.
Although the examples shown here are split across several lines, ensure that each individual command does not contain newlines or carriage returns.
To display a list of all supported switches enter the following
"C:\Program Files\Florencesoft\DiffEngineX\DiffEngineX.exe" /help
from the command prompt.
The only mandatory switches are /inbook1 and /inbook2. From version 3.02 onwards the switch /report is no longer mandatory. Typically you will want different cells to be color highlighted, identical changes grouped together (when adjacent) and the results saved to disk. Your original input workbooks are not modified by the color highlighting. The changes are made to copies. DiffEngineX will never overwrite existing spreadsheets. To ensure your commands are not interrupted you should explicitly delete old reports beforehand. The below example achieves this.

The colors used to indicate modified, deleted and added cell content can be individually specified. If a color is not specified on the command line, the one used by the user interface is taken. The example command below additionally specifies that existing workbook color be removed using the switch /removeexistingcolor.
The available colors (1 - 56) are shown in the palette below.
Figure 5.
Exit Codes
Versions 2.16 and above of DiffEngineX now return meaningful exit codes. Only versions 2.22 and above return codes -5, -6 and -7. Only versions 3.02 and above return codes -8, -9, -101 and -102.
| Exit Code | Description |
|---|---|
| Positive Integer | Number of worksheet cell differences |
| 0 | No worksheet cell differences found |
| -1 | General Error |
| -2 | Number of differences greater than maximum integer value |
| -3 | Workbooks could not be compared due to protected worksheets |
| -4 | Workbooks are different, at least, because of unpaired worksheet names |
| -5 | Row or column alignment has failed |
| -6 | Visual Basic difference report could not be displayed in a web browser |
| -7 | Visual Basic difference report could not be output |
| -8 | Error while comparing Excel defined names |
| -9 | Error while comparing comments |
| -101 | No worksheet cell differences found, but differences found in one or all of VBA, names or comments* |
| -102 | Worksheet cells differences found and differences found in one or all of VBA, names and comments* |
* The switches /comparevisualbasic, /compareexcelnames and /comparecomments must be specified if you wish to check for differences in VBA macros, defined names and comments.
In summary any positive integer, -4, -101 and -102 signify differences have been found in the Excel workbooks. 0 means no differences have been found. All the other codes signify errors or that checking for differences could not be completed.
Switches
If a switch accepts a Boolean true or false value, then omitting the value is equivalent to specifying true i.e. /colordifferences:true is the same as /colordifferences, but not the same as /colordifferences:false.
| Example Switch and Value | Description | Action when Switch Omitted |
|---|---|---|
| /inbook1:"myworkbook1.xls" | Path and file name of 1st book to compare. | Mandatory |
| /inbook2:"myworkbook2.xls" | Path and file name of 2nd book to compare. | Mandatory |
| /report:"mydiffreport.xls" | Path and file name of output difference report. | No copy of the difference report is saved. |
| /outbook1:"coloredcopy1.xls" | Path and file name of altered copy of 1st book to output. Different cells will be colored if /colordifferences specified as well. | No copy saved. |
| /outbook2:"coloredcopy2.xls" | Path and file name of altered copy of 2nd book to output. Different cells will be colored if /colordifferences specified as well. | No copy saved. |
| /alignrows:"A,B" | Comma separated list of alphabetical columns to examine when aligning rows (A - XFD). A maximum of 80 columns can be specified. Typically either "A" or "A,B" will be specified. | Similar rows will not be aligned. |
| /aligncolumns:"1" | Comma separated list of numerical rows to examine when aligning columns. A maximum of 80 rows can be specified. Only use this if all your sheets have a distinct row containing column headings. | Similar columns will not be aligned. |
| /sheets:"Sheet1,Summary,Inputs" | Specify this to limit comparisons to specific sheets. | All the matching sheets in the 2 workbooks will be compared. |
| /colordifferences:true or false | If true, different cells will be color highlighted. The /outbook1 and 2 switches must also be specified. | Different cells will be colored when switch omitted. |
| /removeexistingcolor: true or false | Remove unconditional fill color from cells in workbook copies to make color highlighting clearer. Note /colordifferences must also be specified. | No action. |
| /unhidesheetsrowscols: true or false | Hidden sheets, rows and columns are made visible in workbook copies so differences cannot be obscured. Note /colordifferences must also be specified. | Hidden sheets and cells will be made visible when switch is omitted. |
| /unhideworkbooks: true or false | Hidden workbook copies are made visible. Note /colordifferences must also be specified. | No action. |
| /hiderows:n | n is integer (1 - 5). 1 hides matching rows. 2 hides matching rows except those near differing rows. 3 hides different rows. 4 hides different rows except those near matching rows. 5 hides no rows. Note /colordifferences must also be specified. Takes precedence over /unhidesheetsrowscols. | No rows will be hidden. |
| /compactchanges:true or false | Equivalent changes to adjacent cells are grouped together in difference report. | No action. |
| /coloralternaterows:true or false | Alternate lines in difference report are colored. | No action. |
| /colorpreciseondiffreport:true or false | Text and formulae differences are highlighted at the character level with the color red on the difference report. Time consuming option. | No action. |
| /colorpreciseonworkbooks:true or false | Text, formulae, number and date differences are highlighted at the character level with the color red directly on the workbook copies. Time consuming option. | No action. |
| /compareexcelnames:true or false | Excel defined name differences are listed on the difference report. | No action. |
| /addhyperlinks:true or false | Add hyperlinks to the difference report to aid navigation. Refer to the help file for limitations. Time consuming option. | No action. |
| /comparecomments:true or false | Excel cell comment differences are listed on the difference report. | No action. |
| /comparevisualbasic:"C:\Users\Bob\Documents\vbadiffoutput" | Directory to place the Visual Basic difference report in. Will overwrite the previous report if placed in the same directory. | No action. |
| /stylea1:true or false | If true, formulae are listed using the A1 style in the difference report. If false, R1C1 is used. | A1 style is used when switch omitted. |
| /caseinsensitive:true or false | If true, strings are compared without regards to case. | If omitted, case sensitive comparisons are used. |
| /ignoresmartchardiffs:true or false | If true, curly double and single quotes are treated as equivalent to their straight counterparts. Dashes are equivalent to hyphens. | If omitted, smart characters are treated as different. |
| /whitespacehandling:n | n is integer (1 - 3). 1 does not ignore white space. 2 ignores leading and trailing white space. 3 ignores all non-significant, including leading and trailing, white space. | If omitted, all white space is considered. |
| /compareformulae:true or false | If true, formulae are directly compared, rather than their calculated end results. | If omitted, formulae are compared. |
| /ensureworksinternationally:true or false | If true, DiffEngineX will work despite Control Panel Regional Options differing from the language version of Excel. | DiffEngineX will fail when Regional Options do not equal Excel language. |
| /compareminimumdifference:d | d is a floating point number. Must be greater than or equal to 4.94065645841247E-324. When specified, numeric value differences are only reported if >= the supplied value. Mutually exclusive to /compareminpercentdifference and /comparemaxdecimalplaces. | If omitted, numeric values are tested for an exact match. |
| /compareminpercentdifference:d | d is a floating point number. Must be greater than or equal to 4.94065645841247E-324. When specified, numeric value differences are only reported if the percentage difference >= the supplied value. Mutually exclusive to /compareminimumdifference and /comparemaxdecimalplaces. | If omitted, numeric values are tested for an exact match. |
| /comparemaxdecimalplaces:n | n is integer (-1 to 15). -1 to will compare all fractional digits. 0 to 15 will compare that many decimal places. /roundawayfromzero determines decimal rounding. Mutually exclusive to /compareminimumdifference and /compareminpercentdifference. | If omitted, all fractional digits are compared. |
| /roundawayfromzero:true or false | If true round away from zero, else round to even. Value of this switch only used if /comparemaxdecimalplaces used to compare to a specified number of decimal places. | If omitted, round away from zero. |
| /modifiedcolor:n | n is integer (1 - 56). /colordifferences must be specified as well. | User interface color used. |
| /deletedcolor:n | n is integer (1 - 56). /colordifferences must be specified as well. | User interface color used. |
| /addedcolor:n | n is integer (1 - 56). /colordifferences must be specified as well. | User interface color used. |
| /alignrowcolor:n | n is integer (1 - 56). /colordifferences must be specified as well. | User interface color used. |
| /aligncolcolor:n | n is integer (1 - 56). /colordifferences must be specified as well. | User interface color used. |
| /alignmentplus:true or false | If true, then not only align similar rows and columns, but make sure unmatched rows and columns pair up with blank rows and columns. /alignrows and/or /aligncolumns need to be specified as well. Essentially this is a better version of /interpretmodasadddel. | If omitted, it will be used if /alignrows and/or /aligncolumns are specified as well. |
| /interpretmodasadddel:true or false | If true, interpret a pair of modified cells as one addition and one deletion if they fall in column used for row alignment i.e. are unique row identifiers. /colordifferences and /alignrows must be specified as well. | No action. |
| /show:true or false | If true, display the reports in Excel after comparison. The Visual Basic difference report, if generated, is shown in the default web browser. | No action. |
| /unprotectworksheets:true or false | If true, unprotect any protected worksheets before comparison. If the password is anything other than the empty string, /unprotectworksheetspassword must be specified as well. | No action. |
| /unprotectworksheetspassword:"password" | Password used to unprotect protected worksheets. Note /unprotectworksheets must also be specified. | No action. |
| /turnoffscreenupdating:true or false | If true, then turn off Excel screen updating during comparison. It is recommended screen updating is left unchanged i.e. this switch is either omitted or set to false. | If omitted, the Excel screen updating setting will be unchanged. |
| /turnoffevents:true or false | If true, then turn off Excel events during comparison. | If omitted, Excel events will be turned off. |
| /turnoffautocalc:true or false | If true, then turn off Excel automatic calculation during comparison. | If omitted, Excel automatic calculation will be turned off. |
| /turnoffupdatelinks:true or false | If true, then turn off Excel Ask To Update Links during comparison. | If omitted, Excel Ask To Update Links will be turned off. |
| /help or /h or /? | Displays the available switches. Any other switch, if specified as well, is ignored. | No action. |
Tutorial: How to Compare Two Excel Lists
A common business problem often concerns finding out what names and addresses appear in one list but not another. After the new data has been identified it is useful to be able to extract it into a new Excel workbook.
DiffEngineX can do the bulk of this type of work. Knowing a few Excel tricks and what options to select in DiffEngineX can greatly improve the end results.
Consider the two lists shown below. Even though DiffEngineX has the capability to align similar rows it needs some help from you first. This is because some of the changes involve not just the vertical displacement of rows, but a reordering. In the first list the "Dobbs, Bob" row is before the "Rivers, Doreen" row. In the second list the order has been reversed.
Figure 6 - Two Lists
DiffEngineX will insert blank rows to get existing rows to match up, but it will not reorder them.
To get around this problem you should ask Excel to sort your lists before using DiffEngineX to compare them. (Sorting is an optional step. Your data may not require it.)
Below we see our two original lists after Excel has sorted them on last and first name. Alternatively we could have sorted them by their ID column.
Figure 7 - Two Lists Sorted by Excel
Step-by-Step Instructions
- First Sort using Excel & Save:
Use Excel to open the two workbooks you want to compare. Click on any cell in the first list. Now click Excel's Data menu (or tab in Excel 2007/Excel 2010) and select the Sort item. The Sort dialog will now appear. Sort by Last Name and then by First Name. Hit OK. Now do the same for the second list. In your lists you can sort on any combination of columns that uniquely identifies each row. (Sorting is not always necessary.) - Save both your sorted workbooks (under different filenames if you prefer) before closing them.
- Start up DiffEngineX - Use Options, Extras & Align Rows:
Invoke DiffEngineX and click the Options button. In our example we can see that some street addresses are in upper case and others in lower case. Here we don't want such a trivial change to been counted as a modification and so we select the Case Insensitive Comparisons checkbox. Click OK to dismiss the dialog box. - Click the Extras button. In our example both our lists are small, but in real life some lists may contain tens of thousands of rows and have hundreds of differences between them. DiffEngineX uses color to highlight differences in automatically made copies of the workbooks it compares. We don't want to have to fish through thousands of rows just to see a few differences. Make sure the Hide Matching Rows option is selected. Click OK to dismiss the dialog box.
- Select Align Rows on the main part of DiffEngineX's user interface. Ensure the Use Alignment Plus box is checked. Ensure the Color Differences At Cell Level box is checked. Use the Browse buttons to point to your sorted Excel workbooks. Click the Start Comparison button.
- We now have to tell DiffEngineX what columns uniquely identify each row. As we previously sorted on Last Name & First Name we select columns B and C before clicking the Add button. Hit OK to dismiss the dialog and start the comparison.
- The results are shown below in figure 8. We can see DiffEngineX has correctly spotted the three new rows. However the matching rows are still in this workbook. They are only hidden. (You can see that Excel is not showing rows 1, 2, 4, 5 and 7.)
- The Final Step: Separate the Wheat from the Chaff:
Select the Excel worksheet containing the color highlighted new rows. Click Excel's Edit menu and select Go To. Click the Special... button. Click Visible cells only. (If you are using Excel 2007 or Excel 2010, select the Home tab. Then select Go To Special... from the Find & Select drop-down menu. Select Visible cells only.) Hit OK. Select Edit--->Copy. You have now selected and copied just the visible, new rows. - Create a new Excel workbook and use Edit--->Paste to copy across just the new rows. You now have separated the new rows from the hidden matching rows.
Note: For more complicated examples than shown here, rows may end up being colored red, green or light orange by default to indicate differences. The colors red and green are used to indicate after row alignment one of two corresponding cells is blank. Light orange means a cell has content in both sheets. You will have to inspect both the color highlighted sheets to find out all the differences.
Figure 8 - DiffEngineX Hides Matching Rows

Figure 9 - Use Excel's Edit--->Go To--->Special--->Visible cells only before Copy & Paste